")
Despite all the hair that Bee has, she of course, still has many layers and baby hairs up around the front of her face. Because of this I still don’t tend to just pull her hair straight back because the front part tends to fall out fairly easily. A couple of Sunday’s ago I’d wanted to do a messy bun but make it a bit fancier – so this is what I ended up doing to keep hair from falling out up front.
Start by parting the ear from ear to ear over the top of the head. Then make an off center part from the forehead back to the part you just made. Make a little pony on the left & right sides of the head & secure them with a rubber band.
Take the remaining hair that is hanging down in back & make a ponytail at the center of the back of the head.
")
Take another rubber band & wrap it around the base of the ponytail but on the last wrap of the rubber band don’t pull the pony all the way through. Leave it in a loop like this:
")
Next take the ponytail on the left side of the head & make it nice and smooth. Bring it across the back of the head towards the right side and lay it over the base of the pony tail. Make sure the ends of it are hanging down on the right side of the soon-to-be messy bun.
")
Then take the small ponytail on the right side and cross it over to the left side of the ponytail. As before, make sure the tails of it are on the left side of the “bun.” Now you will have hair hanging out from beneath the “loop” of the bun and the pony ends joining that hair beneath as well.
")
Take a bobby pin & secure those 2 strips of hair to the head just above the base of the pony tail.
")
Just a side note – as I’ve mentioned tons of times – working with damp hair for messy buns is always ideal in my book. I did this pretty much the same way I’ve always done with my messy bun. Take a section of hair & just pull it up & secure it to the head with a bobby pin.
")
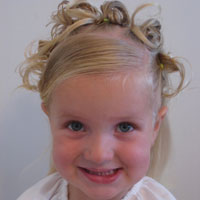
I pulled 3 different sections of hair up and secure them with bobby pins. Be careful only to pull up hair from the bun – not hair hanging down underneath. I basically pulled 3 loops up – one more in the center and one off on the left & right. Exactness is not necessary here.
")
Here’s how it looked from the side.
")
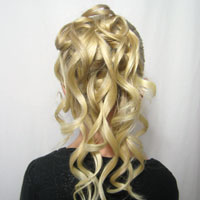
Then I curled the ends that are hanging down underneath the bun with my small curling iron.
")
I didn’t take a picture of this – but pull a few strands up from the curls below & anchor them with a bobby pin randomly around on the messy bun. It makes it a bit fancier and ties it together a bit more I think.
")
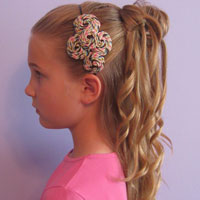
Views from both sides
")
")
")
I also added a few of our bobby pins with sparkly “diamonds” on the end to add a bit of bling to the do. Little flowers or the like would add a very pretty touch to this style for a flower girl or other special occasion.
Don’t forget your 2nd chance to win tickets to Disney on Ice. Head over HERE to enter.
Also — Happy 10th Anniversary to my honey!
If it weren’t for his encouragement
(well and having 3 girls helped too!)
I probably never would have started this site.
So thanks to him for all his love & support! 🙂