") First off — just want to remind everyone about the Fabric Headband giveaway that is still going on from Stylish Mode. Head over to our giveaway site – Hairland’s Shairland – for all the details. You still have a couple days left to enter, and you can enter every day – so go HERE to enter!
First off — just want to remind everyone about the Fabric Headband giveaway that is still going on from Stylish Mode. Head over to our giveaway site – Hairland’s Shairland – for all the details. You still have a couple days left to enter, and you can enter every day – so go HERE to enter!
This is one that I’ve been doing on Goose for a long time now. I thought for sure I’d done a tutorial on this one, but after looking back through things I couldn’t find it. I call this “almost a bun” or “bun w/a swoosh” because back when Goose cut her hair about 2 years ago, her hair was too thick to wrap in a full bun. So this is what we’ve been doing instead. Unless I want a total “knob” look of a bun — which I personally am NOT a fan of, then this is our substitute! The ends of her hair are so thick too and blunt that it’s really hard to get them all neat & tidy once I start getting to the end of the braid – so we love this do and she has this probably once every couple weeks. It’s not a hard or time consuming one – which works great on school mornings.
You can skip this first bit with the accent braid, and just pull it straight back into a ponytail if you prefer. This just adds to it a bit I think. You can do a twist braid, or whatever you feel like if you want. Doing something up front just makes it cuter I think!
Make an off center part on the right side of the head. Then part straight down to the left ear, sectioning out the hair for your accent braid.
")
")
Goose has such pretty highlights in her hair, that I love making the braid just a bit looser so that they show better! Make your braid, twist, or whatever and secure it on the bottom temporarily.
")
Comb the rest of the hair back into a ponytail and secure with a rubber band. Add the accent braid into the rubber band as well. Or you can add a 2nd little rubber band and add the braid once you’ve secured your ponytail.
")
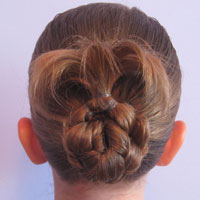
Braid your ponytail – leaving a “tail” at the end. Is it just me – or is her braid thick? It comes clear to my knuckle in my pointer finger in this pic. Anyway, I find it harder to work with such a thick braid – that’s why we came up with this one.
")
Twist the braid around to the left, and over the top of the base of the rubber band.
")
Holding the “bun” in place with one hand, secure it with bobby pins with the other. The “tail” or ends of the braid will fan/spray off to the right side of the “bun.” You can leave it like this – with the ends straight and sort of “spraying” off to the side. Or …
")
I put a bit of pomade in the tail of it and then curled the ends slightly with my flat iron to make it a little prettier.
")
Then add a bow/flower right to cover up the rubber band. There’s kind of a hole there, so it’s a perfect place to add your accessory!
")
")
")
She’s more than happy to show you her “big” teeth that have finally come in with an extra cheesy grin! She’s so happy she doesn’t just have 1 big front tooth now! 🙂")
There you have it – our “Almost a Bun!” And remember, to go enter the fabric headband giveaway!