When I first typed the title for this hairdo I almost wrote “Over the Hedge” (as in the movie) because we recently saw that with the girls for our weekly “summer movie series” that they do at a local theater. I seriously wonder how I function at times! 🙂")
Anyway, this was a fun one that we did for church recently and I really liked it so I did the style again and took step-by-step pictures for ya.
Begin by parting a square section of hair out on top of the head. Part from each temple back to the crown of the head and then across the back to form a bit of a square. Comb the hair towards the left to make a side ponytail. Secure with a rubber band.
")
Section off the rest of the hair on the right side of the head, parting it down to the ear. I held the hair behind the ear out of the way with a clip. Divide the hair hanging down on the right side in half – you’ll be making 2 twists with the hair on the right side of the head.
")
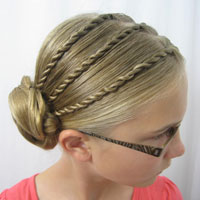
Comb the section of hair up and over towards the left side of the head. Once it is smooth, twist the hair to form a nice tight twist that reaches clear across the head and to the base of the pony tail. Don’t twist it so tight that it starts twisting up on on itself though! Secure the twist with a rubber band to the base of the pony tail.
")
Here’s a view looking from the left side of the head where the twist is secured into the ponytail.
")
With the 2nd section of hair (that is right above the ear) comb it smooth and upwards and repeat what you just did with the first twist.
")
Be sure to not twist it at the same spot you did the first twist because you want the 2nd twist to come behind the first twist – not on top of it.
")
Once you’ve secured the 2nd (back) twist with another rubber band to the pony tail – don’t pull the pony tail all the way through the rubber band on the last wrap of the band. Make a loop to form a messy bun. I did the messy bun “my way.” Just in case you need a refresher – go HERE for the video.
")
Once you’ve fanned the bun out a little with a few bobby pins, take a small section of hair on the left side of the head below the part and bring it towards the back of the head & up behind (kind of underneath) the messy bun. Secure it with a bobby pin or two. I secured a part of the messy bun down on top of this section of hair to hide where it joined the hair on top.
")
With a small curling iron curl the “tails” of the pony tail and twists that hang down on the left side of the head. The curl furthest to the left in this picture is the “tail” of the hair pulled back in the last step. Be sure it’s not pinned back too far or the tail won’t hang nicely with the others.
")
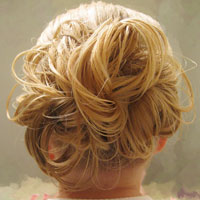
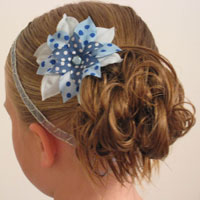
Add a small flower or bow up front and you’re done. Oh – I did turn the ends under on the rest of her hair hanging down in back with my flat iron.
")
")
")
When I did this for church I got her bun a bit higher & loopy looking and I sort of felt like she was a cute little present with a big loopy “bow” on top of her head! It looked totally cute but I’m not used to her having a big “poof” of hair up front on her head like that. The 2nd time I did the style I didn’t have it as high & poofy. You can do it however you prefer!
")
Bee was a bit grumpy before church so I couldn’t get her to look directly at the camera!
")
Oh, and this cute little flower is from Gimme Clips. It’s one of our favs!
")

I LOVE this! I’m going to so this for her school pictures on Tuesday the problem tho is she has bangs. This is perfect because I wanted to tuck them away but I’m afraid they might fall out by picture time. I saw this on a google search, that’s how I found this page and I must say I love it!!! I will continue to come back for more styles!!! Do you do videos?
Hi Katie! So glad you like this one! I’d suggest using a bit of product in her bangs if you are going to try include them in the twists. Maybe some gel or pomade to try keep them from poking out. Definitely some hairspray though. Be sure to get the twists pretty damp when you do it, I find that helps too. Yes, I do videos. I’ve made more recently than I did back when I did this style. I have a tab at the top of my blog that says “videos” and you can find them there. Or head to our Babes in Hairland YouTube channel! Hope school pictures turn out cute! 😉