I had an e-mail from “Curlygirz” this week asking about a rope/twist braid (whatever you call them at your house!) She asked a question that I’d never had before. Now, I’m sure most of you know how to do these by now & I know there are several other blogs out there that have a video of these but for some this may still be helpful — because the rope/twist braid isn’t started from a rubberband.
Curlygirz said she had done this hairdo on one of her DD’s … but she couldn’t figure out how to make a rope/twist braid start at the base of the head, and said she couldn’t find a video where they hadn’t started from a rubberband/ponytail.
So, if you already know how to do this with or without a rubberband – you can just ignore this post … but for Curlygirz – this is for you! BTW – I tried e-mailing you but it was an invalid e-mail address & came back to me. Not sure why – but either way, hope this helps you and a few others.
Oh, and ignore the neat “bunny” nose stuff Goose has going on. She’s been fighting a cold & I told her to keep her hands out of her face for the video — so this is what I got instead! 🙂 Also, to get these to look the best – damp or wet hair always works the best I think.
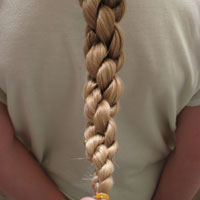
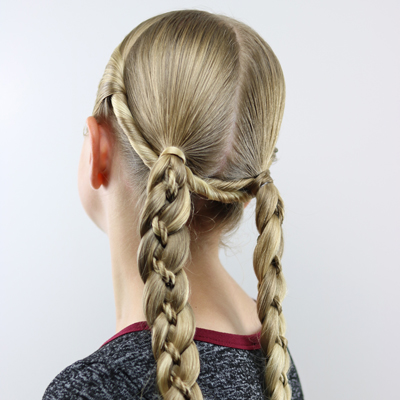
Here is the end result. Nice and smooth – with no rubberband at the beginning of it!")
FYI – because I’m slow, it took me a while to get this! When I first started doing rope/twist braid I would split the hair in 2 and started twisting immediately (as some pro’s may do) but for me it never laid right or looked smooth like I wanted it to. The only way I can get it to work for me is to pass the bottom strand over the top strand first and then start twisting. Everyone has their own methods – but that’s what works for me.
I am so happy to find your site. I think you do an amazing job & so pleased you are willing to share…God Bless
Everytime I try the rope braid like the video it looks great until I tie it at the end then it unwinds( not all the way but loose). What am I doing wrong? Thanks!
Mine tend to unwind a bit too, but the tighter you twist the strands, the less it tends to loosen. Because they loosen up a bit, if I’m adding them into a ponytail or something I usually twist the whole thing a bit to tighten it back up before I secure it into the ponytail or bun. So, I don’t think you’re necessarily doing anything wrong! hth