") I was recently in major need of some serenity and so last week Jenn and I took some time out from our crazy lives and found ourselves a quiet little corner of the world in which to be still. While we were enjoying some quiet from the hustle & bustle of daily life I saw a beautiful gal wearing this style. She had pretty dark hair and while this style is so simple it just spoke volumes to me for some reason! Hers differed a bit from this, but I’m totally in love with this style! I’ve done it 4 times (2x on Goose – 2x on Bee) … and only managed to take pictures once!
I was recently in major need of some serenity and so last week Jenn and I took some time out from our crazy lives and found ourselves a quiet little corner of the world in which to be still. While we were enjoying some quiet from the hustle & bustle of daily life I saw a beautiful gal wearing this style. She had pretty dark hair and while this style is so simple it just spoke volumes to me for some reason! Hers differed a bit from this, but I’m totally in love with this style! I’ve done it 4 times (2x on Goose – 2x on Bee) … and only managed to take pictures once!
Step 1: Make side part on the right of the head
Don’t make it too far back. Then part down to the ear. Repeat on the left side as well.
")
Step 2: Make a ponytail
Take the remaining hair in back and pull into a ponytail that is low at the nape of the neck.
")
Step 3: Part out hair and twist
On the right side divide the hair in front in half. Take the top section and twist it bringing it back toward the ponytail. Temporarily secure it with a bobby pin by the base of the ponytail.
")
Step 4: Make a 2nd twist
Take the lower portion of hair and twist it back over the ponytail. Your 2 twists will make an X. Secure it also with a bobby pin on the left side of the ponytail.
")
This is how I temporarily held the twists in place:
")
Step 5: Repeat steps 3 and 4 on the right side of the head
** Note – I wanted to see how it’d look if I put the top twist over the bottom twist this time — so the sides are actually different. ** I recommend doing them the same on each side – I just wanted to experiment! **
")
Step 6: Secure all 4 twists & remove bobby pins
Take another rubber band and secure the twists to the base of your ponytail. Be sure not to remove the bobby pins until you’ve got them secured with that rubber band!
")
Step 7: Make a rope braid with your ponytail
** The gal I saw had simply wrapped her hair into a bun with no twist or braid. ** My girls’ hair doesn’t stay put very well in that type of a bun so we did a rope braid. Go HERE for our rope braid video.
")
Step 8: To finish – make a bun and secure with bobby pins
To ensure you don’t loose the X from your twists, I recommend putting a bobby pin under the top twist (as shown below) and into the bun and then it won’t sag.
")
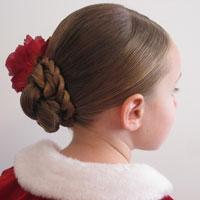
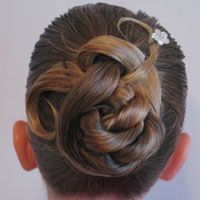
Here’s all your views of this pretty & oh so simple style!
")
")
Thinking back on the lady I saw – her twists came even lower into the bun and more down behind her ears along her hairline. I’m going to attempt that soon & if I get it even closer to hers, I’ll let you know!
")
")
That’s it! Criss Cross Twists into a Bun! Let us know how you like this one and be sure to share pictures with us on our Facebook Page. Have a great day.